UI Customization
IAM provides the default UI pages for user authorization. You can customize the default pages.
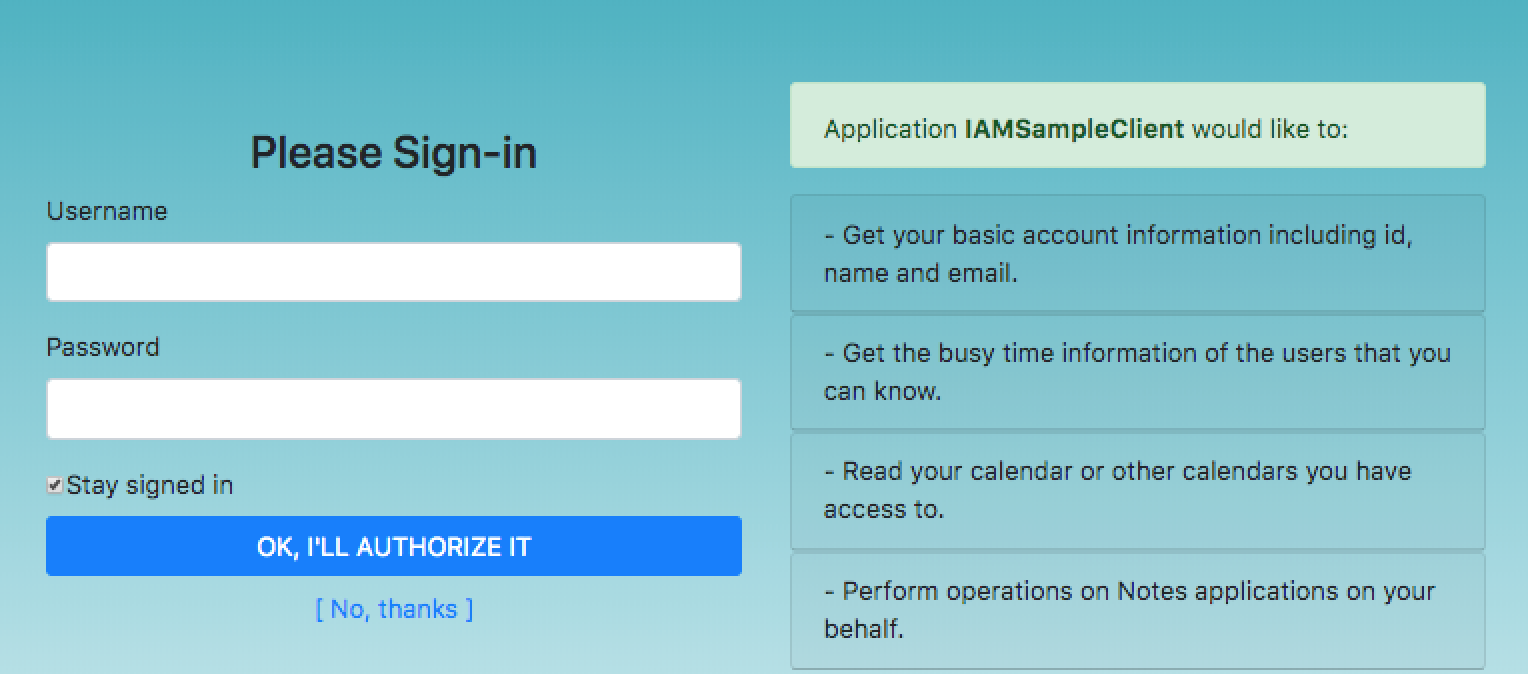
- When a user first accesses IAM, the following login page is shown,
by default, with the application's scopes access requirement:

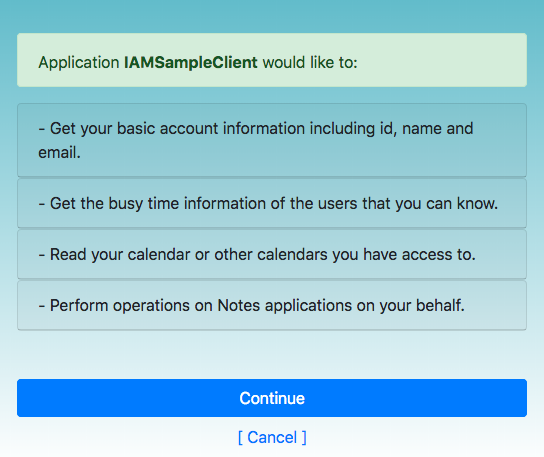
- Once a user is logged in, the following consent page is shown, by default:

You can customize these pages to meet your requirements, for example:
- change the background image.
- change the brand icon.
- change button looks.
- change the arrangement of HTML elements.
- change/add/delete some HTML elements.
Introduction of HTML pages in IAM service
Location of the default pages
IAM's root folder/
| admin-client/
| config/
| dependencies/
| utility/
| views/
| | static/
| | | bootstrap-4.3.0.min.css
| | | service_bg.png  -> the background picture
| | _layout.ejs      -> control the overall layout of all pages
| | error.ejs        -> error page
| | interaction.ejs           -> page to ask user for consent.
| | interactionComponent.ejs  -> a component of 'interaction.ejs'
| | login.ejs                 -> page for user to login
| | loginComponent.ejs        -> a component of 'login.ejs'
| | scopeComponent.ejs    -> a component of both 'interaction.ejs' and 'login.ejs'
| iam-server.js
| package.json
| package-lock.json
Default pages are inside the views directory:
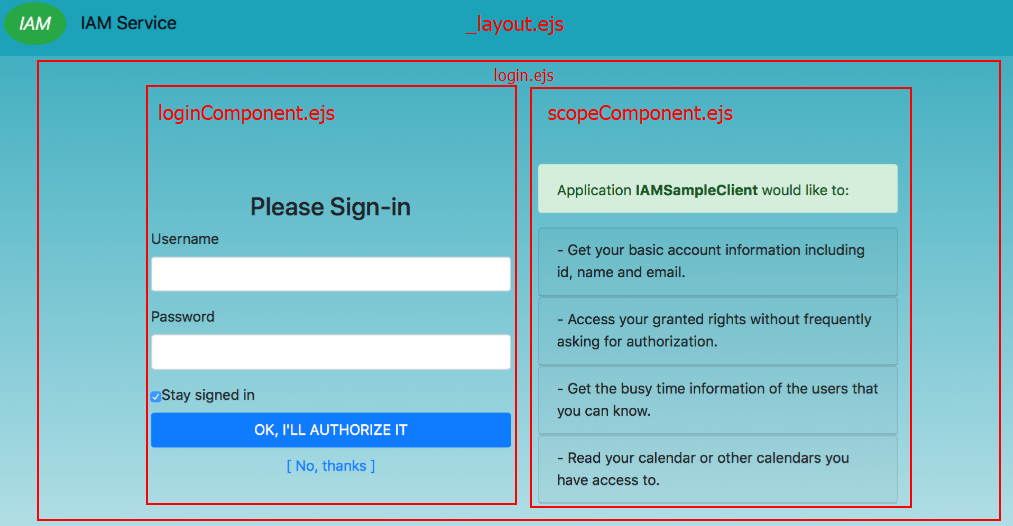
login page
which consumes:
_layout.ejs
  service_bg.png
  login.ejs
    loginComponent.ejs
    scopeComponent.ejs
interaction page (which is used for asking user consent)
which consumes:
_layout.ejs
  service_bg.png
  interaction.ejs
    interactionComponent.ejs
    scopeComponent.ejs
error page
which consumes:
_layout.ejs
  service_bg.png
  error.ejs
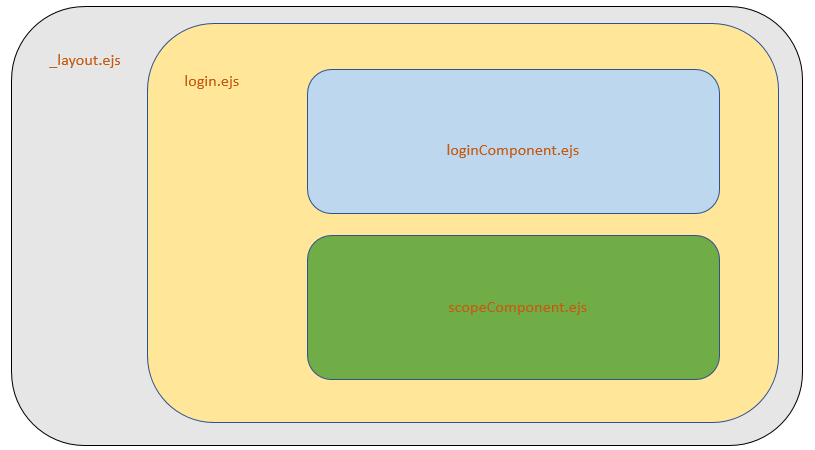
IAM uses ejs to render these pages at the server side. These .ejs
files are template files.
The following pictures show how the login page gets rendered:


How to customize the overall layout and style
_layout.ejs is consumed by all the pages and is used to customize the overall layout and theme.
How to customize the background picture
service_bg.png is consumed by all pages. Replace it with your background image.
How to customize the title of each page
Add following script each page you want to customize it's title:
<script type="test/javascript">
  document.title = 'the title you want to set';
</script>
Steps for customization
Backup
Please backup the default view folder in case you need to start over again.
Customize pages
Verify
Launch IAM and a registered client application to verify the pages.
Tips:
- These pages are hot-deployed, so there is no need to reboot IAM Service after modification.
- domino-node-iam-client provides some examples can be used for test.
- You can run IAM Service under Pilot Mode to reduce some setup steps.
How pages consume data
When IAM renders these pages, it will pass data to your ejs template. The data looks like the following:
Data passed to the login page:
{
  "client": { // the client app information
    "applicationType": "web",
    "clientId": "sampleClientId",
    "clientName": "sampleClientName",
    "clientScopes": ["openid", "das.calendar.read.with.shared", "das.freebusy"], // an array of scopes registered
    "redirectUrl": "https://sample.client/cb",
    "responseTypes": ["code"],
    "subjectType": "public"
  },
  "uuid": "0c2025c9-38dc-4df0-a6ac-195588cd02bd",
  "scopes": [{ // an array of scopes that client requests, must be a subset of "clientScopes"
    "id": "openid",
    "name": "Basic Information",
    "description": "Gets basic information including id, name and email.",
    "grantMessage": "Get your basic account information including id, name and email."
  },
  {
    "id": "das.freebusy",
    "name": "Freebusy Time Access",
    "description": "Collects busy time information for a given user.",
    "grantMessage": "Get the busy time information of the users that you can know."
  }],
  "rejectUrl": "/interaction/0c2025c9-38dc-4df0-a6ac-195588cd02bd/reject",
  "title": 'Please Sign-in',
}
Data passed to consent page:
{
  "client": { // the client app information
    "applicationType": "web",
    "clientId": "sampleClientId",
    "clientName": "sampleClientName",
    "clientScopes": ["das.calendar.read.with.shared", "openid", "das.freebusy"],
    "redirectUrl": "https://sample.client/cb",
    "responseTypes": ["code"],
    "subjectType": "public"
  },
  "uuid": "90ce8b8d-03fa-47cc-ad3a-3ac2e71169fd",
  "scopes": [{ // an array of scopes that client requests, must be a subset of "clientScopes"
    "id": "das.calendar.read.with.shared",
    "name": "Calendar Read Access (includes delegated calendar)",
    "description": "Allows users to read any calendars they have access to.",
    "grantMessage": "Read your calendar or other calendars you have access to."
  }],
  "rejectUrl": "/interaction/90ce8b8d-03fa-47cc-ad3a-3ac2e71169fd/reject",
  "account": { // user account information
    "sub": "cn=sampleuser, cn=Users, dc=hcl, dc=com",
    "email": "sampleuser@hcl.com",
    "name": "sample user",
    "notes_dn": "cn=sampleuser, cn=Users, dc=hcl, dc=com",
    "accountId": "cn=sampleuser, cn=Users, dc=hcl, dc=com"
  },
  "title": "Authorize",
}
How to redirect among pages
request to login in login page:
protocol: HTTPS
method: POST
path:
'/interaction/${uuid}/login'
post parameters:
  uuid: the session id.
  remember: 1 -> stay me sign in until session timeout; 0 -> always need to sign in next time.
request to reject in login page:
protocol: HTTPS
method: GET
path:
'/interaction/${uuid}/reject'
get parameters:
  no additional parameter needed.
request to confirm in consent page:
protocol: HTTPS
method: POST
path:
'/interaction/${uuid}/confirm'
post parameters:
  uuid: the session id.
request to reject in consent page:
protocol: HTTPS
method: GET
path:
'/interaction/${uuid}/reject'
get parameters:
  no additional parameter needed.